7 Simple Fixes for Window Shots That Look Washed Out or Too Dark
Window shots are where listings often lose momentum. If the window turns into a white block, the room feels bland. If you expose for the view and the interior goes dark, the space feels smaller than it is.
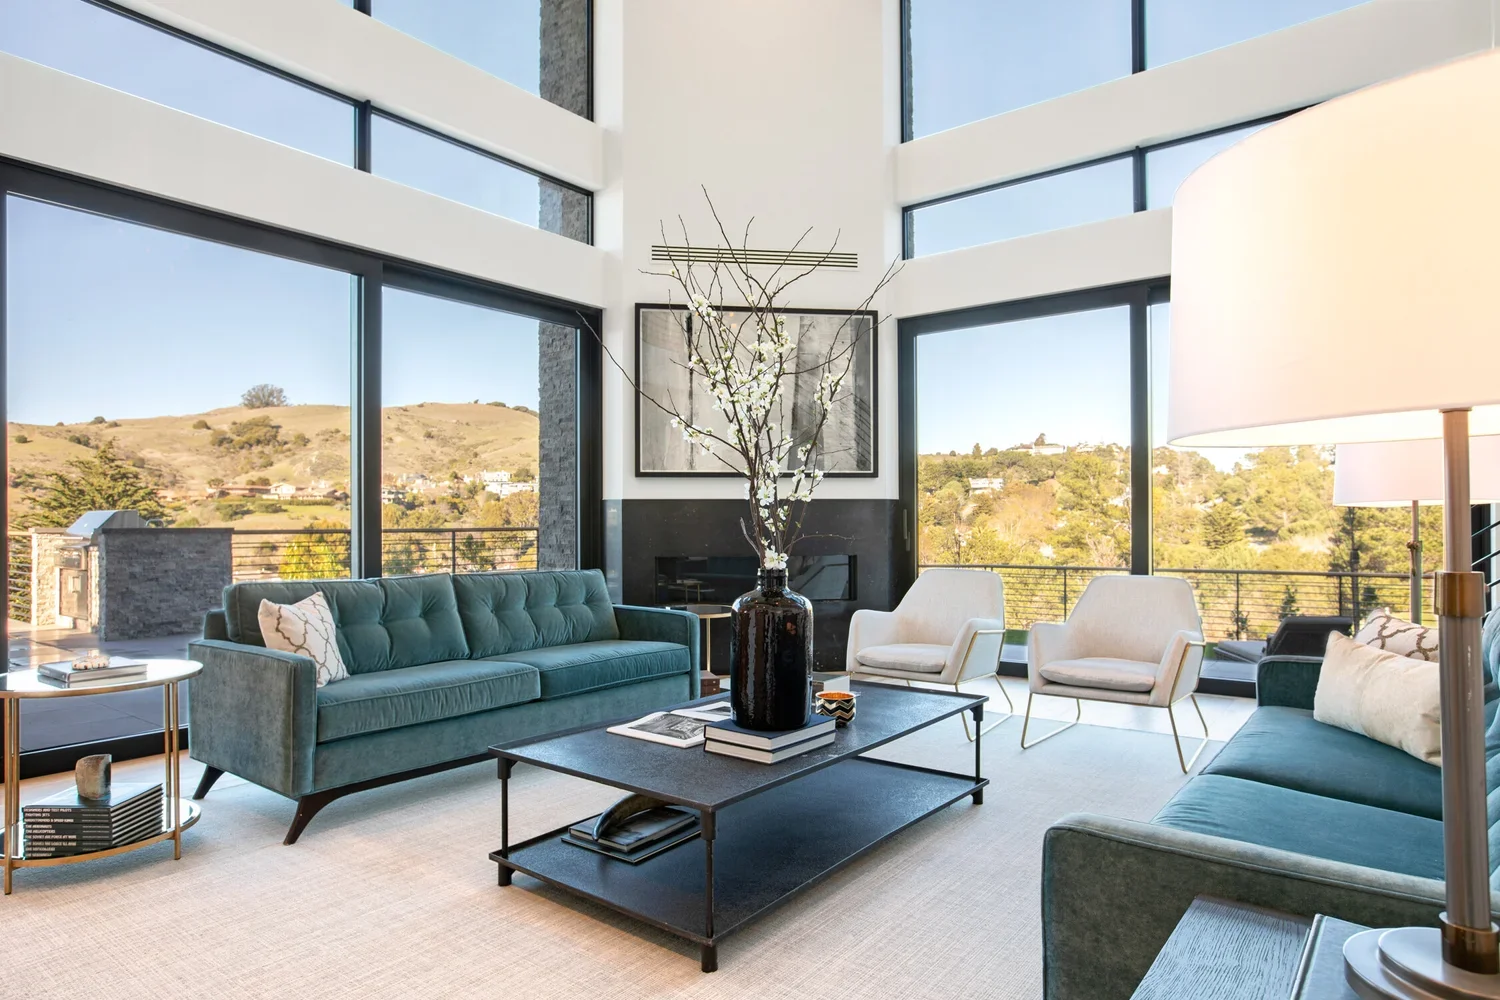
The fix is rarely “better gear.” It’s a repeatable mix of prep, angle choices, clean lighting, and a simple capture plan that keeps both the room and the view readable. Here in this post, we will discuss how to address washed-out windows and dark rooms using seven actionable solutions that can be applied to actual photography projects, as well as how to use these photos (in MLS gallery pages, listing emails, social media recap posts, and buyers’ portals). In the case of San Francisco Real Estate Photography, balancing the windows is one of the quickest ways to achieve a premium look.
Why Do Windows Blow Out?
Fix 1 is understanding what’s actually happening. The camera is trying to expose for two different worlds at once: bright outdoor light and a darker indoor space. When the gap is big, something gets sacrificed unless you plan for it.
Common causes:
Midday sun hitting the glass directly
Bright sky behind the home, especially near sunset
Dark interiors with few fixtures on
Mixed bulbs that color-shift the room
A quick real-life example: a condo with a great view looked “cheap” online because every living room photo had a glowing white window. The space itself was clean, but buyers couldn’t see the value. This is where Real Estate Photography San Francisco workflows typically start with window control first, because it protects both clarity and perceived quality.
Reset The Room First

Fix 2 is prepping the scene so the camera doesn’t fight chaos. A clean, bright room is easier to expose. A cluttered, dark room forces the camera to lift shadows, which makes windows blow out even faster.
A simple reset that helps window shots immediately:
Clear the window ledge and anything reflective nearby
Turn chairs and sofas slightly so the eye travels toward the light
Wipe smudges on glass if they catch glare
Remove shiny clutter that throws bright hotspots into the frame
If the room feels visually noisy, the window becomes the “only point of interest,” which makes overexposure look even worse. A small staging cleanup often fixes more than people expect, especially in compact spaces where windows are the hero feature.
Control Mixed Room Lighting
Fix 3 is keeping the room’s light consistent before you shoot. Window photos fail fast when bulbs don’t match or one corner is bright and the rest is dim. Use a few lights that add even brightness, replace dead bulbs, and switch off anything that throws yellow pools or harsh glare. In Real Estate Photography Bay Area listings, clean, consistent light matters because color shifts stand out when buyers compare galleries.
Shoot Angles With Depth
Fix 4 is choosing an angle that balances the room and the window. Straight-on window shots often blow out the view and darken the interior. A corner angle usually works better: it adds depth, keeps the window from dominating, and makes the space feel calmer. Keep vertical lines straight and avoid shooting into direct sun. A Real Estate Photographer San Francisco will usually build the frame so the window reads as a feature, not as a lighting problem.
Balance Exposure In Camera
Fix 5 is controlling exposure intentionally instead of letting the camera decide. Window shots usually improve when you protect highlights first, then bring the room up with lighting and angle choices.
A practical approach:
Meter for the brighter area near the window first
Take a “safe” frame that holds the view detail
Take a second frame that protects the interior brightness
Keep the camera stable so frames align cleanly
This is where planning matters. When you know the listing needs both “bright room” and “clear view,” you capture with that outcome in mind, not as an afterthought. If you’ve ever wondered how to photograph windows without losing the view, the simplest answer is to shoot for highlights on purpose and give yourself a second interior-safe option so the room does not collapse into shadow.
For San Francisco Real Estate Photography, this is especially useful in high-rise units and view listings where the outside light can be dramatically brighter than the interior.
Edit For Natural Contrast
Fix 6 is keeping the edit realistic. Heavy editing can make rooms look flat, muddy, or unnatural. The best window edits feel like what the human eye experienced: readable view detail, bright interior, and no weird halos around frames.
What usually helps:
Lift shadows gently instead of cranking brightness everywhere
Pull back highlights so the view isn’t a white block
Keep whites neutral so walls don’t look gray or yellow
Avoid aggressive HDR that makes edges look fake
A real example: a living room looked “fine” on the photographer’s monitor, but looked harsh online because the edit pushed HDR too far. Pulling it back made the view look clearer, and the room feel more trustworthy. Buyers don’t need perfection, they need believability.
If you want a steady benchmark, think of best exposure settings for interior window shots as the starting point, then keep the edit restrained so the final image still feels like a real space, not a filter.
Make Window Photos Sell
Fix 7 is sequencing and intent. Even good window shots can underperform if they’re uploaded in the wrong order. The first images should build clarity, then showcase the window feature once the viewer understands the space.
A simple order that usually performs well:
Start with the room’s best “layout clarity” angle
Follow with a window-inclusive frame that shows the feature naturally
Add one detail shot if the view is a major selling point
Keep the most “dramatic” window frame later, once trust is earned
When the listing reads clearly, a bright window becomes a value moment, not a distraction. That’s why Real Estate Photography Bay Area teams often plan the window shots as part of the overall story rather than treating them like stand-alone “pretty photos.”
At Slava Blazer Photography, we have adopted a relaxed yet marketing-driven approach when it comes to Real Estate Photography San Francisco. We prepare ourselves for clear interior lighting, angle selection with depth, framing with protection from the room and its views, and editing with an impeccable finish without being too much. For quality window photography that is bright, authentic, and attractive enough to pause on your screen, contact us for a quick quote and shooting schedule.
Frequently Asked Questions
Why do window photos look white in listings?
Window photos turn white when the camera exposes for the darker interior and blows out the bright outdoor light. This happens most often with midday sun, bright skies, or dark rooms with minimal interior lighting. The fix is usually protecting highlights first, reducing glare, and making the interior brighter through clean lighting and better angles. When the room is evenly lit, the window has a much better chance of holding detail.Should blinds be open or closed for real estate photos?
In most cases, open blinds help because natural light makes rooms feel larger and more welcoming. The exception is direct glare or harsh sun beams that create hotspots on floors and counters. If glare is severe, partial blinds or a slight angle change can keep the room bright without turning the window into a white block. The decision should be based on how the light behaves at that time of day.Can you show the view and the interior at the same time?
Yes, but it requires planning. The easiest method is capturing at least one frame that protects the view detail and another that keeps the room bright, then choosing the best balance in editing. If you try to force one single exposure to do everything, you often end up with either a dark room or a blown window. A calm, controlled approach delivers both clarity and realism.What is the most common error with window edits?
Overdoing it. Overusing the HDR function will result in halos along window frames and the removal of textures. This will give the buyer an unnatural feeling, even if he can’t pinpoint exactly why. The best editing approach restores highlights carefully, minimizes shadows just enough to reveal details, and leaves wall colors neutral. When the interior appears realistic, the window becomes more prominent.How many window-specific pictures should be included?
It depends on how significant the view is, but generally ranges from one to three images. Most listings need only one image that features the window yet still displays the room’s layout. Should the view be a key part of the listing, two shots should suffice, the first being a view shot and the latter featuring fine details of the window. More than that will bore the buyer and slow him down in the gallery.