Real Estate Photography That Gets Clicks: What to Shoot First and Why

Real estate photos win clicks when they make a buyer feel oriented in seconds. Not “wow, pretty,” but “I get this place.” The first few images decide whether someone keeps scrolling, saves the listing, or bounces back to search. That’s why what you shoot first matters just as much as how clean the home is.
In this blog, we will discuss the opening shots that earn attention, the order that makes layouts feel easy to understand, and how to plan a photo set that stays honest while still looking premium online. When you hire a Real Estate Photographer San Francisco, the biggest advantage is usually structure: a shoot that starts with the right frames and builds a story buyers can follow.
Start With One Hero Room
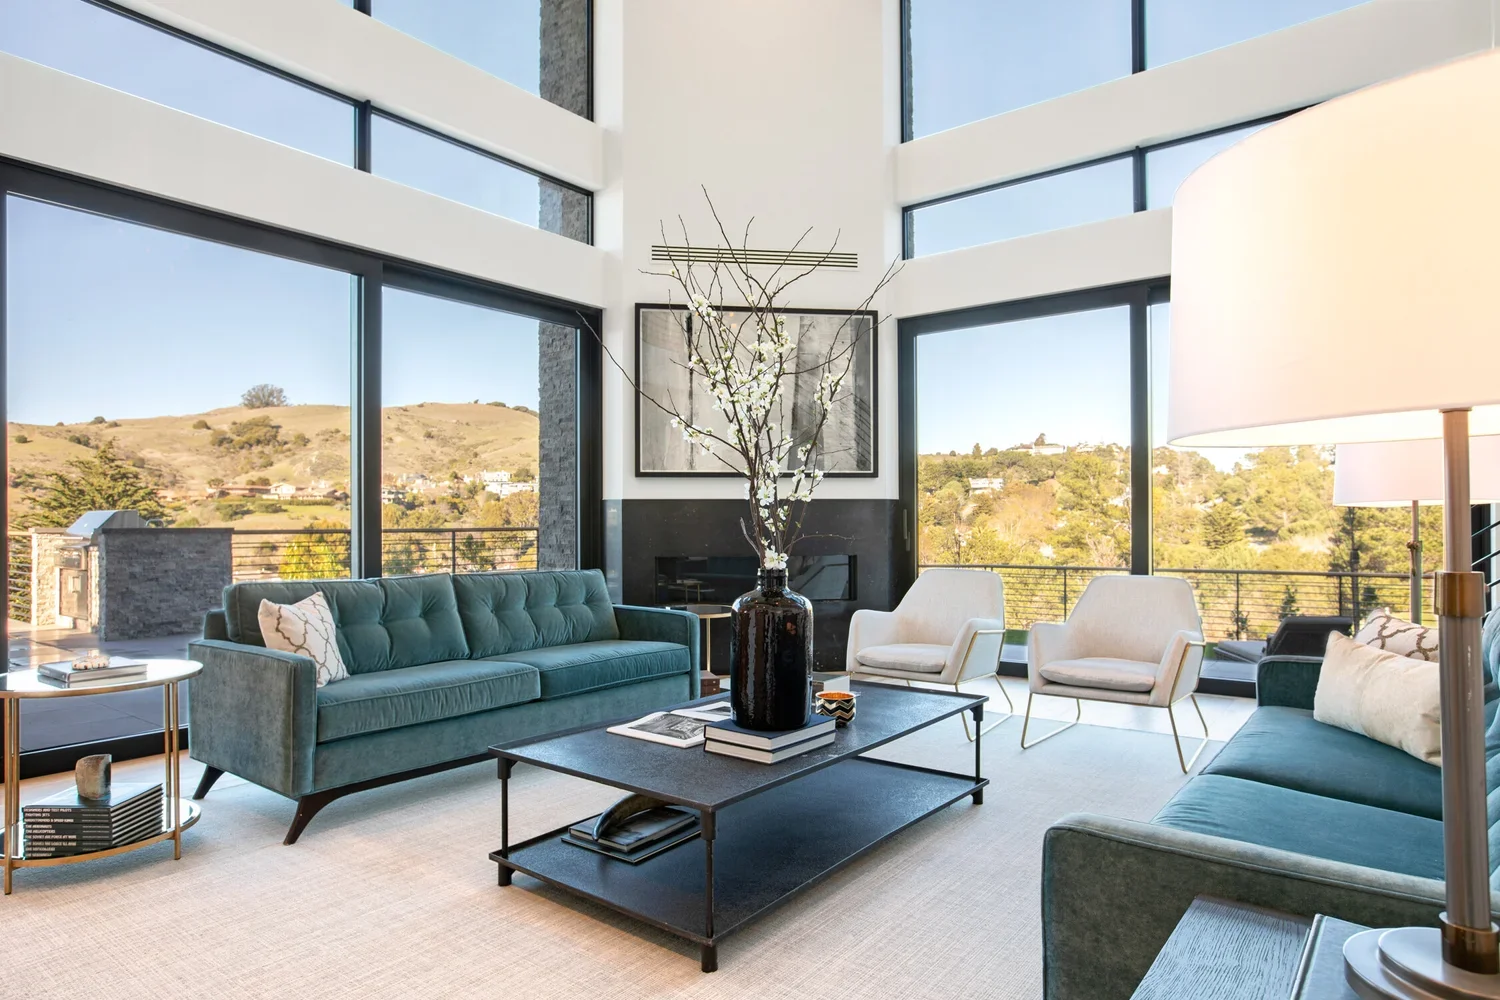
Your first image should do one job: make the home feel welcoming and easy. In most listings, that’s the living area or the main open space, because it signals light, layout, and lifestyle all at once.
A strong “hero” room photo usually has:
Natural light that feels real, not blown out
Depth (you can see into the space, not just a flat wall)
A clean focal point (window, seating area, fireplace, view)
A practical example: in a small condo, the living room shot performs best when it shows the seating zone and a glimpse of the kitchen connection. Buyers stop longer because they understand flow immediately, which is exactly what Real Estate Photography San Francisco should deliver in the first swipe.
Show The Flow Early
After the hero image, buyers want a quick walkthrough. They don’t need every corner yet, they need orientation. The fastest way to give that is to show how key spaces connect.
A clean early sequence:
Living area → kitchen connection
Kitchen → dining nook or counter space
Primary bedroom → enough angle to understand size and light
Here’s the tradeoff: if you jump into detail shots too early, you lose people who are still trying to understand the layout. Wide and mid-wide images earn trust first; details can come later.
For San Francisco Real Estate Photography, this is especially true because many listings are compact. Clarity beats cleverness.
Capture Kitchens Before They Shift
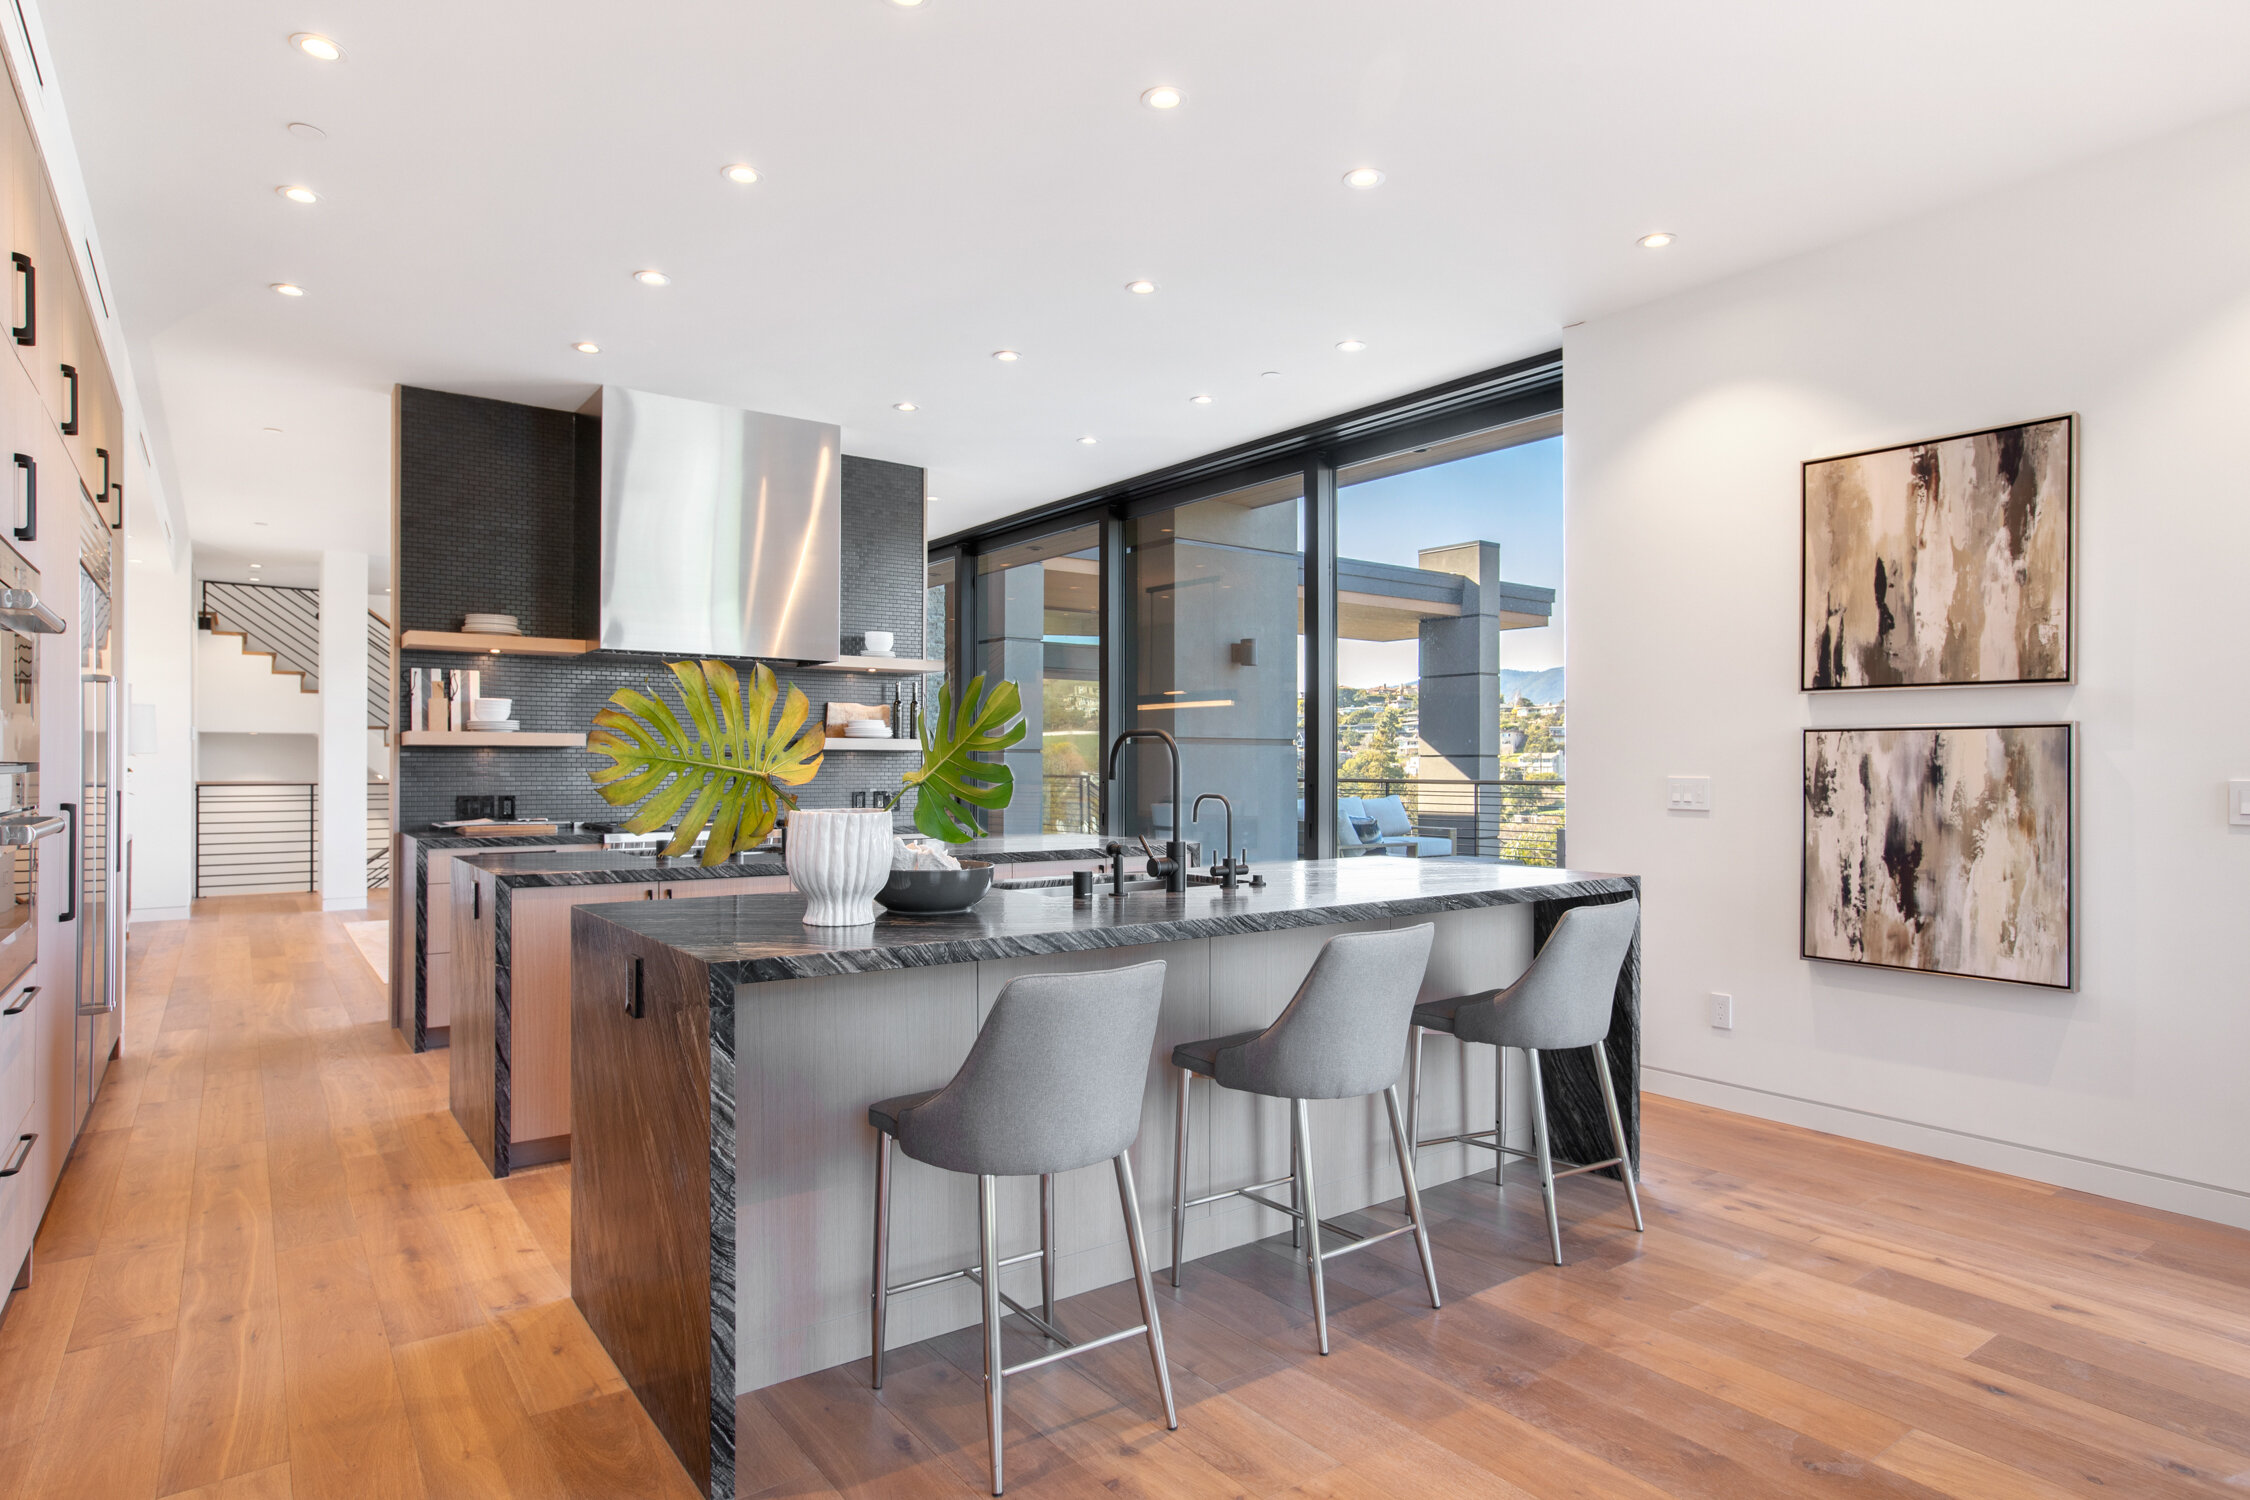
Kitchens photograph best before the house starts getting “lived in” again. It sounds obvious, but it’s the most common reason kitchen photos end up messy: mail returns to counters, towels appear, and little appliances creep back into frame.
Before you shoot the kitchen, do a quick reset:
Clear counters down to one or two items
Hide dish soap, sponges, and cleaning bottles
Close or align cabinet doors
Turn on under-cabinet lighting if it looks clean and even
A real-world example: an agent once rushed a shoot and left a drying rack in the sink “because it’s small.” It became the first thing viewers noticed. Five minutes of reset would’ve made the kitchen feel far more premium.
This is where Real Estate Photography Bay Area planning pays off: kitchens and bathrooms often decide emotional value, even in smaller homes.
Don’t Skip The Bedroom Read
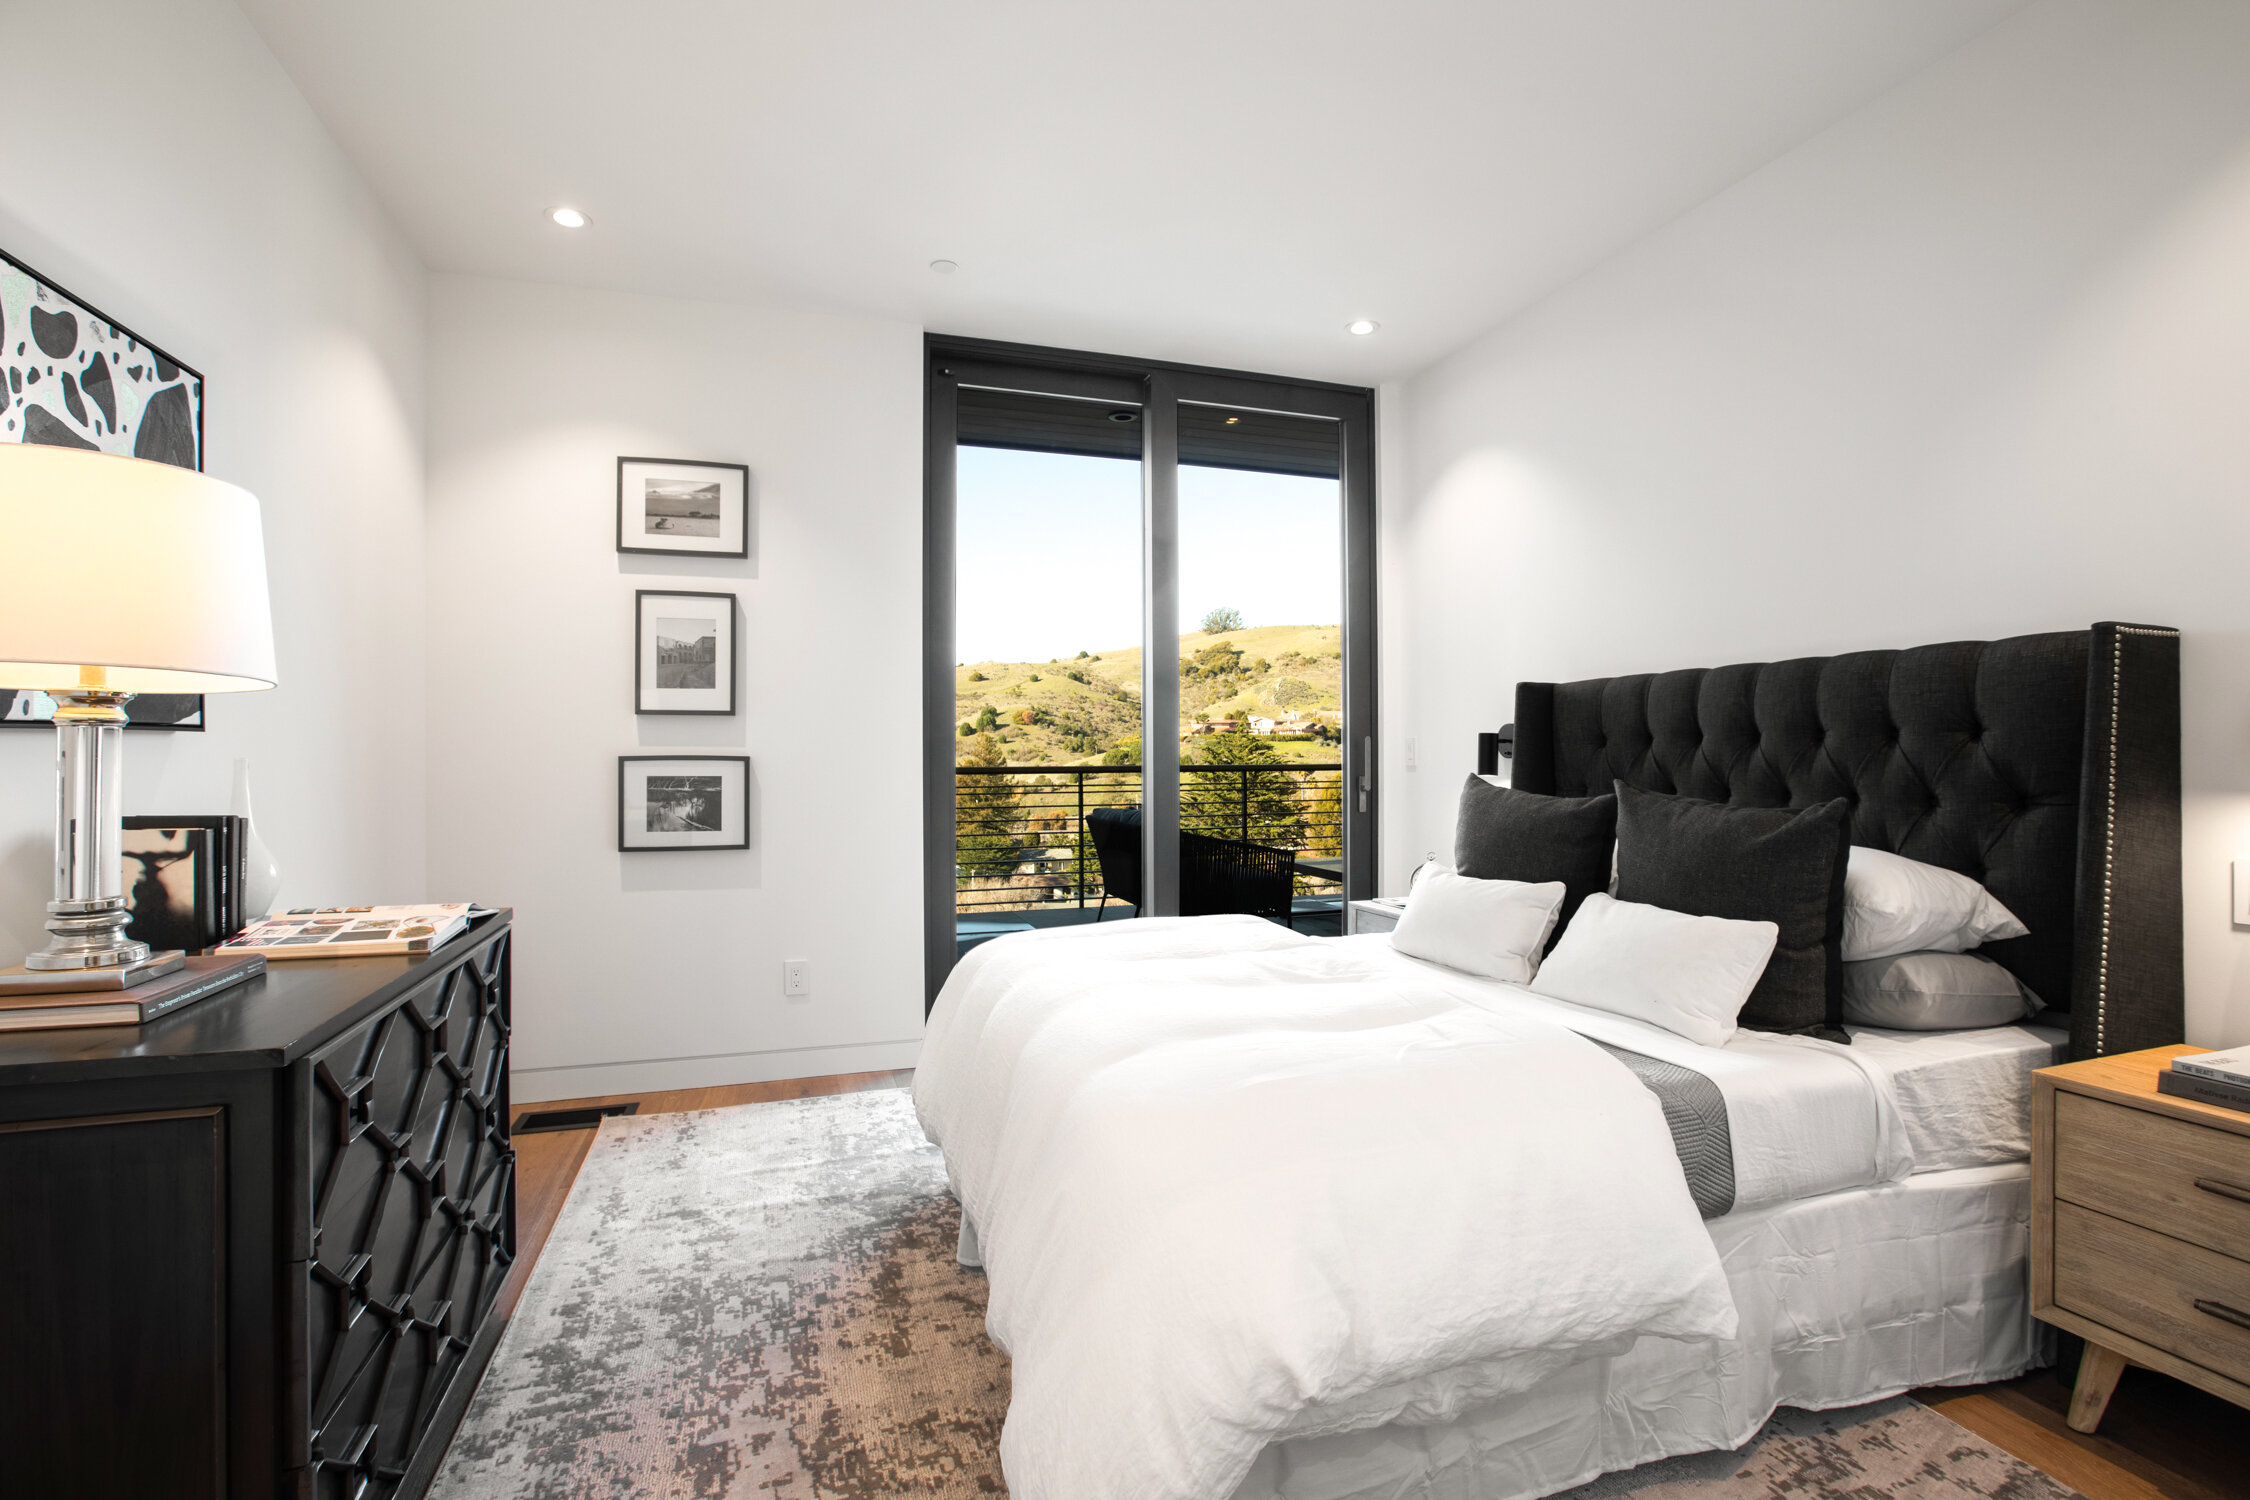
Bedrooms don’t need to be oversized to look appealing. They need to look calm, tidy, and believable. Buyers want to know: can I sleep here comfortably, and where does furniture go?
A bedroom shot that earns trust usually includes:
A made bed with clean lines
A visible walkway on at least one side
Light that doesn’t turn the room gray
A frame that hints at storage without forcing it
If you’re working with a Real Estate Photographer San Francisco, they’ll often choose angles that show usable space without making it feel distorted. That balance matters, because overly wide images can feel misleading.
Bathrooms Need Bright Simplicity
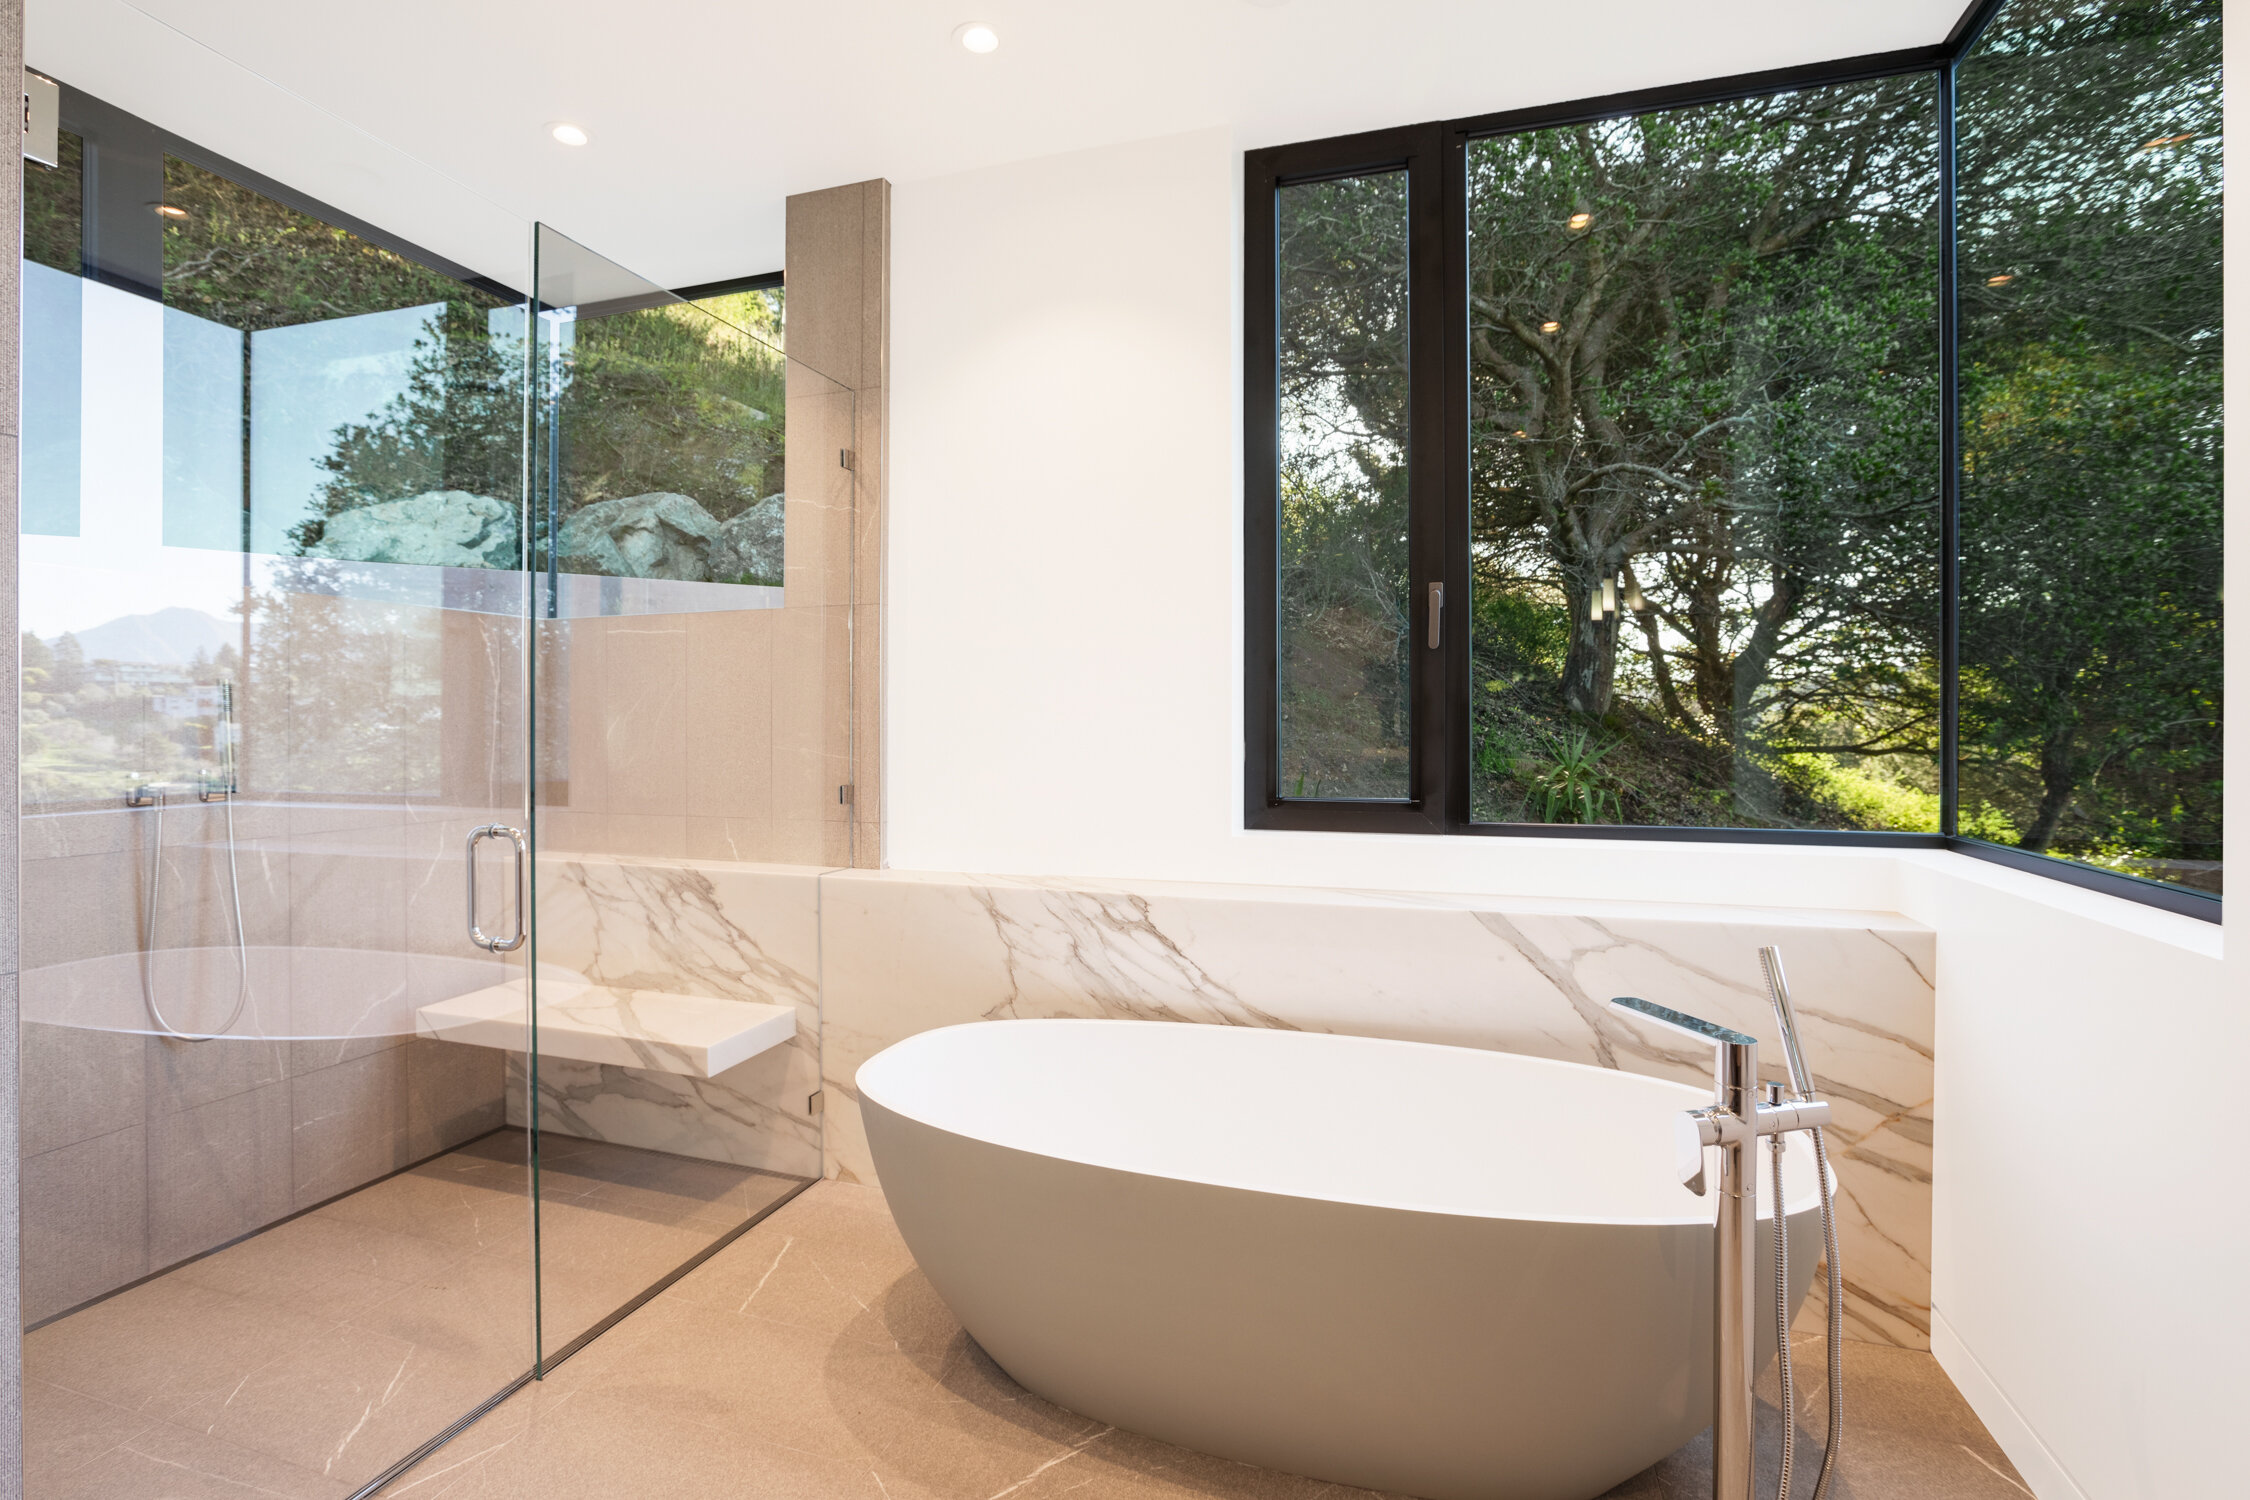
Bathrooms can quietly kill a listing’s visual momentum. If they look dark or cluttered, buyers assume the whole home is less maintained, even if it isn’t.
Quick bathroom wins:
Remove everything from the counter except one clean accent
Close the toilet lid (always)
Straighten towels or remove them entirely
Clean mirrors and chrome so they don’t look hazy
A small but important detail: if a bathroom has a window, expose for the room first, then manage the window brightness so it doesn’t become a white block. Good Real Estate Photography San Francisco keeps bathrooms feeling clean and bright without looking artificially edited.
What Order Gets More Saves?
Once the core rooms are clear, the next goal is “save-worthy value.” That’s where you highlight features that make buyers think, “This is worth touring.”
Save-driving shots often include:
Natural light moments (a sunny corner, a window seat, a bright hallway)
Storage clarity (closets, pantry, built-ins, shown tastefully)
Outdoor space or balcony, if it exists
A clean exterior or entry shot that signals pride of ownership
A simple example: a narrow hallway can still become a strong image if it’s bright, tidy, and leads the viewer toward a desirable room. People save listings that feel easy and livable.
If you want a reliable real estate photo order that increases listing clicks, it usually starts with orientation (hero + flow) and then earns saves with value features.
Clicks Come From Clarity
A listing doesn’t need the biggest rooms to win attention. It needs photos that help buyers understand the home quickly and feel confident about what they’re seeing. Start with a strong hero room, show flow early, keep kitchens and baths clean and bright, and finish with value moments that make the listing feel worth saving. That structure makes your photo set feel premium without exaggeration, which protects trust and improves engagement.
If you’re investing in Real Estate Photography Bay Area, the best outcome is a set that reads clearly on every platform and keeps buyers moving forward. And at Slava Blazer Photography, our team brings a calm, marketing-aware approach, starting with the frames that earn clicks, then building a sequence that helps buyers understand the space and want to see it in person. Reach out for a quick quote, and we’ll help you plan a photo set that’s built to perform from the first image.
Frequently Asked Questions
How many photos should a listing post first to keep buyers scrolling?
Most listings perform best when the first 8–12 images act like a quick, logical walkthrough. Start with one “hero” room that shows light and depth, then show the main connection (living-to-kitchen or living-to-dining), followed by the kitchen, primary bedroom, and a bathroom. After that, add one or two “value” frames, balcony, view, storage, or a clean entry shot. If the first set feels repetitive or unclear, buyers often back out even if the later photos are strong. The goal of the opening is simple: help someone understand the home before you try to impress them.Should detail shots come early or later in the gallery?
Later. Detail shots work best once the viewer already trusts the layout and wants proof of quality. If you lead with close-ups, tile, faucets, hardware, buyers can’t tell what the space feels like, and the listing may come across as disorganized or overly “styled.” Use wide and mid-wide images first, then bring in details as support: upgraded finishes, clean cabinetry, a thoughtful staging touch, or a well-lit feature. Think of details as the “bonus points” after the buyer is already interested, not the opening argument.Does photo order matter if the photos are already good?
Yes, because buyers don’t view listing photos like art, they use them to make a fast decision. A strong set can still underperform if the opening sequence is dark, out of order, or confusing. Good order makes the listing feel easier to trust: it reduces mental effort, explains flow, and keeps attention moving forward. It also helps across platforms that crop thumbnails or place extra weight on the first image. When the story is clear, people save the listing more often and stay engaged long enough to reach the “value” shots.